42 Inch Round Table in White Oak
Background
For at least the last 20 years we’ve had a 48 inch round dining room table in our kitchen nook. Like most folks, we ended up using this as our primary dining table and while it was great, it was always a bit over sized for the space. Recently, while we were updating other parts of our house, we decided to finally replace the table with a 42 inch one that felt less bulky.
Jokes aside, six inches may not seem like a lot but if you multiply it out, a 48 inch table has a surface area of approximately 1809 squared inches, while a 42 inch table has a surface area of approximately 1385 squared inches. That’s a difference of 414 squared inches, so almost three full square feet smaller, which is considerable.
We knew we wanted a solid hardwood table and we liked the look of white oak. Most of the tables we found on-line were either super expensive ($3000+) and/or had straight or chunky legs which we didn’t love. What we wanted was something closer to our outdoor table which has legs that curve into a center ring and then out again.

After a fair bit of research I decided to try tackling the table build myself.
Design

Using SketchUp Maker (2017) I worked up some designs until I had something I was happy with. I knew I wanted to curve the legs in, but I wasn’t entirely sure how to do it. My initial idea (which you can sort of see in the sketch up) was to build the legs by laminating three thinner boards together. By overlapping them at the curve I thought I could build a strong joint. I still think this is a good design idea that would create a very strong curved leg, but in the end I went with a more traditional joint and just used dowels.
Wood
After making a cut list I went down to Crosscut Hardwoods and picked up ~30 feet of 6/4 for the table top and ~15 feet of 8/4 for the legs. The total cost for the wood was around $400.
Once I had the wood home I let it acclimate in the house for about a week before starting to mill it down. While I do have a planer I don’t have a jointer so I had to use a sled for the planer to get one side flat and a simple jig for my table saw to get a straight edge.
Table Top
After finding an arrangement I liked for the top I glued the boards together and let them dry overnight.
Mistake #1
I opted to not use any dowels or biscuits as they don’t really do much for adding strength. Not using anything for alignment proved to be a mistake as I didn’t get the boards perfectly flush and after it dried I had to take a hand plane and resurface both the top and bottom. Next time I’m probably going to put at least a couple of dowels in to assist with alignment

Once the top was dry I used a circle cutting jig and a spiral bit on my plunge router to cut the circle. I only cut it 3/4 of the way down before flipping the top over and using a flush trim bit on my trim router to finish the circle.
Mistake #2
I wasn’t entirely sure how far to plunge cut before flipping the table over. Several videos I watched on this seemed to suggest you only needed to make one or two passes with the router before flipping the table over. Thankfully I took it down further as my trim router was barely able to cut through what I had left. In the future it’s probably safer to take this down to 1/4 inch before flipping.

Legs
For the legs I first used cardboard to try out several different variations until I found something I liked. Although I had my sketchup design it helps to actually see it in person. Plus, once I had my cardboard template I was able to work backwards to figure out how big my leg blanks needed to be.
To do this I took my cardboard template and cut it right where I was picturing my joint to be. Then I was able to flip over the top piece and tape it back together which gave me an approximate template for how big I needed to cut each leg blank. Since I kept top and bottom leg angles the same, the resulting template was now perfectly straight and the taped cut line gave me the exact angle I needed.
Lining up the dowels for the joints was a process but everything came together pretty well in the end.

I did have some concerns that the dowel joints might not be strong enough as the pressure from the table to would basically be trying to pry them apart. To counter act this I made sure that when I jointed in my cross pieces that I used four dowels which really locked in this joint.
(And yes, I used more glue than what is shown. I had forgotten to take a picture, so I stopped in the middle of my glue up to snap this one.)
Mistake #3
Clamping the legs proved more difficult than I anticipated. I first tried the trick of gluing cauls to some blue tape, but those popped off pretty quickly when I started to tighten the clamps. Thankfully I had created some angle extensions that I was able to clamp to the individual pieces and then add an additional clamp. If I had to do it over again I would plan this part out better.

Once set I built a simple jig so that I could make parallel cuts in the top and bottom of the leg, as well as create the flat inner cut. Using this I was able to get all four legs nearly identical.

Next I made a router template from a piece of MDF I had lying around and used it to cut the inner edge of each leg. I did the same process of only cutting part of the way through from the top, then removing the template and flipping the piece over to cut the rest with the flush trim bit.

Finally I cut the center joining pieces and created a lap joint for them to fit together. Then I glued up each set of legs.

Sanding
Then came the sanding. All in all I probably spent 2 full days sanding everything. I started with 80 grit sandpaper and took it all the way up to 220 and used a wand light to make sure there were no imperfections.
Mistake #4
The finish I was planning on using was Rubio Monocoat which actually does not recommend going past 150 grit, so I then made one more pass to bring it back down to 150.
Related, although I like Rubio Monocoat, it is wildly expensive. On my next project I’m likely going to try to use Natura Onecoat as it reportedly works similar to Rubio and is about half the cost.

Mistake #5
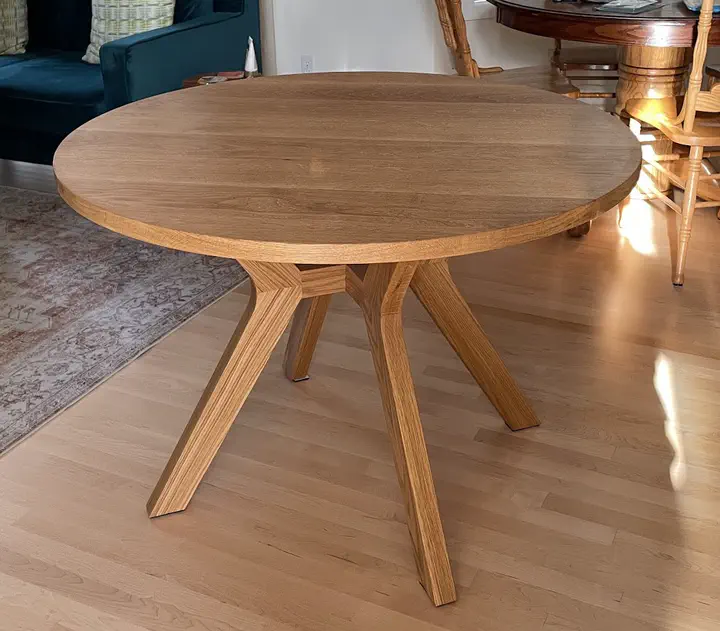
After testing out several different samples I ended up going with Pure which, in retrospect, was probably a bit of a mistake. I still really like how the table looks, but its a little too honey colored for my tastes. I think something with a small percentage of white would have offset the honey color, but its too late now and overall I’m pretty happy with the way it turned out.

Final thoughts
This project took about two months to complete. I was mostly working on it during the weekends and some evenings. I did allow myself to buy a planer for this project and I needed to buy a couple of router bits as well. So all included (wood, planer, router bits, Rubio Monocoat, …) I probably spent about $1200 in total on this project. And while this is a lot, it’s still a far cry from the $3000 we were seeing on-line and I’m pretty proud to have built this myself.
Joshua Gerth
Engineering Manager
Distributed Systems Engineer
Systems Architect
My research interests include big data, language parsing and ray tracing.