Summiting Mt. Hood 2022
Background
In March 2022 I was accepted into the Mazamas BCEP program which taught basic rock and snow climbing skills. This was a fantastic experience and I highly recommend the program if you are in the Northwest and are at all interested in hiking and climbing. Once the program completed I signed up to join the Mt. Hood Climb scheduled for May 8, 2022 (mothers day), which was eventually pushed back to the following Wednesday (May 11th) due to weather conditions. There were a total of nine people (including the climb leaders) in the climbing group.
The day before
The day before the climb I drove up to Timberline Lodge and parked in the lower parking lot that allows climbers to camp/park overnight. In the weeks before the climb I had built a flat “bed” in the back of my Honda Pilot so I could put a sleeping pad down and stretch out.

It’s a really good idea to get to the parking lot the night before and start to acclimate to the altitude. Timberline lodge is at around 6,000 ft of elevation and the top of Mt. Hood is 11,249 so the more time you have to acclimate the better.
Six of the nine people from our group opted to show up the night before with three people driving up the morning of the climb. Initially we were planning to start our climb at 1am the next morning, but due to temperatures being lower than expected we were able to push our start time back to 2pm.
As the temperature heats up it can cause the ice and snow to soften creating dangerous climbing conditions as rocks and ice are more likely to break away and fall on you. Additionally, warmer temperatures weaken the structure of snow bridges over crevasses which increases risk. Ideally you want to climb when everything is frozen solid and stable.
So after rechecking my pack several times I finally went to sleep around 8pm.
The day of
Getting Ready
For a start time of 2am I should ideally have woken up at 1am to begin getting ready, but due to nerves I awoke up closer to 12am and was unable to fall back asleep. So at 12:30am I gave up trying and started getting ready for the climb. The day before I had prepared oatmeal in a thermos with hot water which made for nice warm breakfast. After breakfast I started to get my gear on and mentally prepare for the climb.
In addition to everything in my pack, I was also carrying one of the climbing ropes we were bringing in case we needed it going over the bergschrund. This added around 15 lbs to my pack and was a bit awkward to carry as you have to sling it over your pack. (I was also carring the fuel for the teams stove in my pack as we were required to bring it, but this only added a nominal amount of weight.)
Starting the climb
Just before 2am we started off. The night was amazingly clear but exceedingly cold. As we were hiking up we could see the headlights from other climbers further up the mountain who had left earlier.
The first part of the climb takes you to the top of the Palmer Lift and the route you take is along the “road” the snowcats create when coming back after grooming the ski slope. So the snow is pretty compacted and you can climb it easily in just your mountaineering boots and without crampons. (Crampons are great, but they are heavy, increase the likelihood of tripping, and generally slow you down.)

Silcox Hut
At approximately 3am we reached Silcox Hut and two things had already happened. First, two people decided to drop out of the climb as they were not feeling well. (It should be noted that both of these people were from the group that decided to drive up the morning of the climb so they did not have the extra six plus hours to acclimate to the altitude.)
Secondly, my water was starting to freeze. I had made the mistake of using a bladder for my water with an attached hose for drinking. This was the same setup I had used on multiple hikes and ski trips so I thought that as long as, after taking a drink, I blew air into my hose I could keep it mostly thawed. The problem was that the nozzle had collected water and was mostly frozen solid. After a lot of work I managed to get it somewhat unclogged and had, what would turn out to be, my last sip of water until after I was off the summit. In retrospect this was a huge and possibly dangerous mistake on my part and I should have carried backup water in my pack.
Somewhere between Silcox Hut and the top of the Palmer lift we started to get whiffs of the fumaroles on Mt. Hood which smells strong of sulfur.
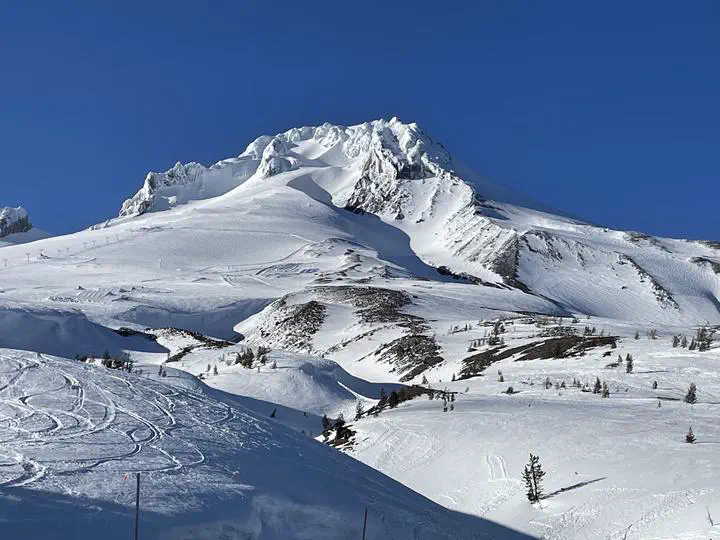
Top of Palmer
At 4:40am we reached the top of the Palmer lift. The sun was starting to come up a bit but it was still really cold.

For the climb up to the Hogsback (and summit beyond) we would be in deep snow and no longer on a groomed trail so we needed our crampons, helmets and ice axes.

I was also able to switch off carrying the climbing rope to another climber so for the rest of the time my pack was 15 lbs lighter which made a considerable difference.
We had brought snowshoes for the climb, but after looking at the steps already dug for us by the previous climbers, we decided to stash our snowshoes near Palmer and go on without them.


You can see the shadow of the mountain on the landscape below.


Hogsback
Once we reached the Hogsback we were able to see the different routes to the summit. The Pearly Gates looked safe enough and the bergschrund was sufficiently covered that we felt comfortable climbing to the summit without ropes. This allowed us to stash our ropes and harnesses which removed a considerable amount of weight from our packs.

Fumaroles
At the Hogsback you can also see the fumaroles to either side of the path to the Pearly Gates. It’s important to watch your step near them because while they are warm, it’s really the lack of oxygen that will kill you before the heat will. That said, they are rather stunning in the snow.


Pearly Gates
We were forced to wait a bit at Hogsback as there were a lot of people trying to get through the Pearly Gates and the section right before the Gates themselves is the bergschrund, which you want to pass over as quickly as possible.


Going through the Pearly Gates was one of the more surreal experiences of the entire climb. First, the angle is rather steep so a lot of the climb is on your hands and feet. The climbers before us had already cut steps into the snow so it isn’t particularly hard, but it is slow going and some areas are only wide enough for two people (one going up and one going down) so you are forced to go as slow as the person ahead of you is going. Secondly, the natural ice sculptures that have been created from the snow and wind are stunningly beautiful.


Of course, the entire time I was climbing up through the Pearly Gates I had it in the back of my mind that I would shortly be having to climb down this as well.
The Summit
Once you pass through the Pearly Gates the top of the mountain actually levels off a bit and the summit is mostly flat with only about a 10-15% incline.


The view from the top is nothing short of breathtaking. The sun was out and we could see for miles. It was, however, very cold and we still had to down climb through the Pearly Gates.
The climb down
While climbing up through the Pearly Gates you can plan out where you are going to step, but the way back down requires a lot more trust. This is where having spikes on the front of your crampons and mountaineering boots really pays off. For most steps I would kick my foot into the snow a couple of times until I had created a slight indentation and then use the spikes to hold the majority of my weight. My mountaineering boots had a full shank so as long as my toes were secure I could stand up securely with the majority of my foot suspended by just my toes.
Initially this was hard for me to relax into, but after a while I really started to trust my equipment and the climb down became a lot easier.
Plunge stepping down to Palmer

Once we were back at the Hogsback my water tube finally thawed enough that I was able to get a drink. After that we collected the ropes and harnesses we had stashed and headed down to Palmer.
We started out on the trail we had taken getting to the Hogsback, but quickly drifted off and were mostly plunge stepping down to Palmer. Some of the folks in our group tried glissading down, but the snow was pretty deep which made for slow going.
Glissading
At Palmer we collected the snow shoes we had stashed and got back onto the groomed snowcat trail. We also quickly discovered that while glissading in the deep snow was difficult, glissading on the groomed snowcat trail was really easy. I had brought with me some medium gauge plastic that worked okay as a sled as I was able to glissade for probably 75% of the way from Palmer back to Timberline.
Back at the car
Finally back at the car we packed up our gear and drove into Welches to have lunch. After lunch I went into the parking lot, got into my sleeping bag and took a four hour nap before finally driving home.
Gear
What follows is a full listing of all the gear (to the best of my memory) that I had with me on the hike. With the exception of my water situation and some slight changes for my feet and hands, the rest of my gear really held up well and I don’t think I would change much, if anything, for the next time.
Feet
- Hiking socks
- Scapra Charmoz HD mountaineering boots
- Hikenture leg gaiters
- Grivel crampons
- Snowshoes
I also have some Sealskinz socks which I’ll likely be wearing next time and I’m experimenting around with a couple different brands of heated socks. The Sealskinz, in addition to being waterproof which is a nice just-in-case feature, really trap in the heat, so these with the heated socks should be pretty nice.
The snowshoes I borrowed from a friend, but since this trip I have purchased my own pair from REI using their 20% off coupon. Not long after I purchased mine I noticed that Costco was also selling snowshoes as a seasonal item at the start of winter so that might have been another option, but I don’t know how heavy they are.
Pants
- Zero Degree base layer leggings
- Kuhl Snow/Hiking Pants
The Kuhl are fantastic. They are rugged enough for hiking in, insulated and priced reasonably.
Torso
- Zero Degree long sleeve base layer
- Quick dry t-shirt
- Mountain Hardware Gore-Tex Infinium thin hooded coat
- 32 Degree Heat down jacket
- Columbia hooded rain coat
The down jacket was a cheap one I bought off of Amazon for like $40 for camping and the Mountain Hardware and Columbia jackets I purchased at the Columbia employee store for a discount.
Head
- Balaclava
- Thin beanie hat
- Mountaineering Helmet
- Headlamp
- Glacier glasses
Before leaving I loosened my helmet so that I was sure I could wear it easily over the balaclava and beanie. The balaclava was actually something I received for free from a local go kart race track. It was cold enough that the condensation that collected on my balaclava from breathing through it froze as well.
The beanie hat is an Omni-Heat one from Columbia so it has gold dots on the inside which really do a great job of reflecting the heat back.
Hands
- Glove liners
- Three finger gloves
- Garmin Fenix 7
Mittens would have been ideal, but in order to try to keep some dexterity I opted for three finger gloves which have a dedicated finger for your thumb and index finger, and then a mitten like pouch for your remaining three fingers. This caused my index finger to get really cold so next time I’m either going to invest in heated gloves, or get some mittens. If I do get mittens I’ll probably use some of the chemical heating packets which I can stuff down in the outer glove.
The Garmin is useful as it has an altimeter so you can figure out how close you are to different milestones. It also has the ability to record your entire climb and has a full map which you can use in a pinch if you get lost.
Backpack
- Ten essential items
- Rock climbing harness
- 2 Nalgene 1L water (next time)
- Thick hat (for when I wasn’t wearing my helmet)
- Blue bag (just in case)
- Extra glove liners
- Extra glove shell (five fingers)
- Small waffle sitting pad
- Cell phone
My backpack is a Mountain Hardware 25L Scrambler I purchased from the Columbia employee store. In addition to being a perfect size it also has loops on the outside for two ice axes and I was able to easily attach my hiking poles and snow shoes.
I’ve listed two 1L Nalgene bottles which, of course, I didn’t have on my trip but really really wished I did. It’s important that you store the bottle upside down in your pack so when it starts to freeze it doesn’t seal the bottle shut. Instead I had my water bladder (which I didn’t list) but which was such a bad idea I’m leaving it off my list.
For the beginning part of the climb I had my crampons in my backpack which worked out well, but wrapping them so they don’t rip your backpack is a bit of a trick. I ended up using a mailing envelope but I might look to see if I can get/make a leather pouch for next time or see if I can somehow attach them to the outside of my backpack.
Misc
- Ice axe
- Hiking poles
- Snacks and energy cubes
- Glissading sled
Although I was only carrying one ice axe, I really think two would have been a better idea and wouldn’t have added much weight.
For the glissading sled I had made mine out of some shelf liner plastic from Home Depot but it really didn’t hold up well. While riding down one corner folded in on itself and I kept having to stop to fix things and by the time I was finally down it was mostly ruined. Since this trip I’ve gone to Tap Plastics and purchased a sheet of thicker, but still flexible, plastic and have constructed a better sled.
Closing thoughts
10/10 would do it again
I had a fantastic time overall, the weather was near perfect and the climbing was excellent. The ice sculptures near the summit are unworldly and something that you really need to see in person to believe. It was also amazing standing at the highest point in all of Oregon and being able to see for miles around you.
The cold was no joke
I think overall I underestimated how cold it was going to get. In addition to my water tube freezing and leaving me without water for the majority of the climb, my fingers and toes also suffered. I suspect that I have Raynaud’s disease which causes my body to abandon my fingers and toes pretty quickly when I get cold. Although I was wearing gloves and glove liners, my fingers still became very cold and numb. Plus, putting on my crampons, opening my backpack and even just getting my snack bag opened required me to take off at least my outer glove layer which didn’t help. I also started to lose feeling in my toes around Palmer and continued to lose more feeling in my feet for the rest of the climb.
Normally once I warm up the feeling comes back into my fingers and toes pretty quickly, but not this time. For at least the first week after the climb (and some of the next) I still had loss of feeling in my toes, thumbs and forefingers. This was unnerving and at the time I wasn’t quite sure if I would ever regain feeling. Eventually, slowly, the feeling did come back and now I’m back to normal, but it’s not something I really want to repeat.
For next time I have purchased some battery powered socks and mittens that I’m hoping will keep me warmer. Plus, I’m going to be taking some of those chemical hand warmers with me as well.

Joshua Gerth
Engineering Manager
Distributed Systems Engineer
Systems Architect
My research interests include big data, language parsing and ray tracing.